First steps
* Make sure you are logged on as a user with administrator rights:
Right click on the file directory: C:\AUTOFLUID10 > Properties > Security tab
Click on the corresponding user name: "full control" must be checked.
1. Check your CAD software compatibility with AUTOFLUID
2. If you use AutoCAD, check your workspace.
In your command line type: cui (enter)

* Check your work space settings (they must be set to current AND default):
> Select your work space
> Right click "set current"
> Right click > "Default settings" > "Apply" > "Close"
* Check your partial customization files. If you see the mention (UNRESOLVED) and/or (MIGRATED): right click > "unload" > "OK"
3. If you're using AUTOCAD. In the command line type: appload (return)
In "Startup Suite" :

Click on "Contents" and delete all AUTOFLUID related content > "Close".
If you're using BricsCAD. In the command line type: appload (return). Uncheck "Autoload" in front of AUTOFLUID related items.
If you're using ZWCAD. In the command line type: appload (return) > Startup > remove all AUTOFLUID related items.
4. Check your Windows and Excel settings.
5. Check that you've updated AUTOFLUID INFINITY:
Click on "Preference"
Then in the dialog box click on "About" > "Update" and if required, follow the update instructions.
6. Ensure you are using Dotnet 8.0 or higher :
- Go to your directory C:\Program Files\dotnet\shared\Microsoft.WindowsDesktop.App
- Search for a directory name that begins with 8 or a higher number.
If Dotnet 8.0 or higher is not present, here is how to update Dotnet:
- If you are not logged in as an administrator, start a new administrator Windows to work with full rights. (Using administrator codes to authorise operations within a user session is not enough).
- of Visit the page https://dotnet.microsoft.com/en-us/download/dotnet/8.0
- Download and install ".NET Desktop Runtime x64".
If you are using BricsCAD, please also install ".Net Framework 4.8" or higher. Visit https://dotnet.microsoft.com/en-us/download/dotnet-framework to download the installation file.
If the problem continues please fill in the hotline form to contact a technician.
* Make sure you are logged on as a user with administrator rights:
Right click on the file directory: C:\AUTOFLUID10 > Properties > Security tab
Click on the corresponding user name: "full control" must be checked.
If you are using the USB key protection system and your USB key doesn't light up then try plugging it into a different USB ports.
1. Check your CAD software compatibility
AUTOFLUID 10 is compatible with:
- AutoCAD full 2006 to 2024
- Bricscad Pro V12 to V23
- ZWCAD Pro 2012 to 2015 et ZWCAD 2021 to 2023
- AutoCAD LT and Cadsta Max (same year of version) 2023 to 2024
2. In your CAD software command line type: cui (enter)
* Check your work space settings (they must be set to current AND default):
> Select your work space
> Right click "set current"
> Right click > "Default settings" > "Apply" > "Close"
* For AutoCAD : If you see a (UNRESOLVED) and/or (MIGRATED): right click > "unload" > "OK"
3. If you're using AUTOCAD. In the command line type: appload (return)
In "Startup Suite" :
Click on "Contents" and delete all AUTOFLUID related content > "Close".
If you're using BricsCAD. In the command line type: appload (return). Uncheck "Autoload" in front of AUTOFLUID related items.
If you're using ZWCAD. In the command line type: appload (return) > Startup > remove all AUTOFLUID related items.
4. Check your Windows and Excel settings:
Windows Vista - Windows 7 - Windows 8 - Windows 10
Excel 2007 - Excel 2010 - Excel 2013/2016/365
5. Check that your AUTOFLUID is updated:
Display the latest patch number.
Download the patch.
If the problem continues please fill in the hotline form to contact a technician.
Start
* Make sure you are logged in as a user with administrator rights:
Right click on the file directory: C:\AUTOFLUID10 > Properties > Security tab
Click on the corresponding user name: "full control" must be checked.
- If you are using the USB key protection system :
> Test your key by plugging it into different USB ports.
If the error message persists :
1. Select C:\AUTOFLUID10\DPCOM.bat > Right-click > 'Run as administrator'
2. Launch AUTOFLUID.
- If you are using the IDN protection system (serial number) :
This message means that your license is not authorized yet. Click on ‘IDN License’ and follow the instructions that were sent by email.
If the problem continues please fill in the hotline form to contact a technician.
Install the latest available patch:
Display the latest patch number.
Download the patch.
No error message is displayed OR error messages displayed:
- AUTOFLUID command interrupted
- ; error: End Of File (EOF)
- ; error: incorrect structure in the list of entries
- ; error: malformed list on input
> See paragraph "Preferences issue".
Error message :
- AUDIT-00 AUTOFLUID will not operate properly on this drawing
> See paragraph: "Slow speed issue with some .DWG files".
This message will appear in the command line if your installation is incomplete.
To check the installation go to C:\AUTOFLUID10\Plus ; This folder must contain the following folders and files:
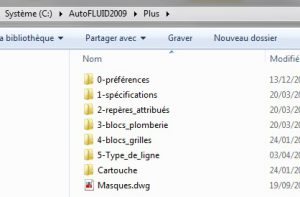
If this isn't the case please re-install AUTOFLUID:
1.Delete the folder AUTOFLUID10 from your C:\ hard drive
2. Re-install AUTOFLUID by downloading the install file
See the installation instructions.
If the problem continues please fill in the hotline form to contact a technician.
There are too many applications running on the same .DWG at once. You must purge some of them.
1. Open your CAD software with an empty file
2. In the command line type: _ RECOVER and select your .DWG file
3. Save the .DWG and then PURGE it using the CAD basic command
4. Save the .DWG and close it
5. Repeat the PURGE operation once
6. Reopen your .DWG file and launch the AUTOFLUID Files Treatment
- Uncheck all the option boxes
- Click on "Start treatment"
In AUTOFLUID INFINITY


In AUTOFLUID 10

7. Save the .DWG
If the treatment crashes (too many entities to be treated)
1. Reopen your .DWG file and launch AUTOFLUID
2. In your CAD software command line type: (Purge-dico) and validate
3. Save the .DWG and close it
4. Repeat the operation once
5. Restart the AUTOFLUID Files Treatment (see image above):
* Uncheck the options boxes
* Click on "Start treatment"
6. Save the .DWG
If the problem continues please fill in the hotline form to contact a technician.
This issue is linked to your choice of language for Windows.
1. in 'Control panel' > 'Clock, Language and Region' > click on 'Region'

2. In the 'Administrative' tab > 'Change system local' > select 'English'

If the problem continues please fill in the hotline form to contact a technician.
This issu is caused by AUTOCAD.
1. Check you are using the latest version of AUTOCAD.
2. If you are, launch the repair process. Go to:
Settings > Apps > Installed apps. Click on the dots next to your software and select "Modify". A dialog box appears > click on repair/uninstall.
3. You can also reset your AutoCAD settings to default. Go to the Start menu in Windows > "All apps" > your AutoCAD folder > left-click on the app to unravel > "Restore default settings".

4. If none of these solutions solve your problem, uninstall AUTOCAD, reboot your PC and re-install AUTOCAD.
If the problem continues please fill in the hotline form to contact a technician.
Menu issues
1. In your CAD software command line type: options (return)
2. In the "Display" tab un-check the option below:
![]()
3.Click on the 'Files' tab and check that it contains the following path:

If the path is missing then add it by clicking on the "add" and "browse" buttons
4. In your CAD software command line type: appload (return)
5. Select the AUTOFLUID menu: C:\AUTOFLUID10\AUTOFLUID10-Menu-EN.lsp > Load > Close
If the problem persists please fill in the hotline form to contact a technician.
1.Right-clic on the ribbon or any toolbar.
2. Select 'Toolbar size' then 'Small icons'.

3.On the command line, type 'OPTIONS' (entrer)
4. On the menu, open 'Program options' then 'Files'. Select 'support file search path

5. If C:\AUTOFLUID10\ATF\bmp is missing, add it by clicking on 'Add path'. Find it through your computer files then 'OK'.

6. On the BRICSCAD command line, type 'APPLOAD' (enter)
7. Select the AUTOFLUID menu C:\AUTOFLUID10\AUTOFLUID10-Menu-FR.lsp. Click on 'Add application file' then 'Close.

If the problem persists please fill in the hotline form to contact a technician.
* Make sure you are logged on as a user with administrator rights:
Right-Click on the file directory C:\AUTOFLUID10 > Properties > Security tab
Click on the corresponding user name > "Full Control" must be checked.
1. In the AUTOCAD command line type: cui (return)

- Select "All customisation Files"
- Right-click on "AUTOFLUID.INFINITY" > "Unload MENU.CUIX"
- Right-click on "AF-DOUBLECLIC" > "Unload AF-DOUBLECLIC.CUIX".
2. In the same dialogue box: check your workspace (it must be set to "current" AND "default")

- Select your workspace
- Right-click on "Set Current
- Right-click on "Set Default" > "Ok"
- If a menu is marked "MIGRATED", select it > Right-click > "Delete" > "Close".
3. In the directory C:\AUTOFLUID10\Menu :
- Keep the .ZIP, .mnl, .plus files
- Delete all the other files.
4. In the AUTOCAD command line type: appload (return)
In Startup suite click on "Contents..." and delete everything that's related to AUTOFLUID > "Close"

5. Load the AUTOFLUID menu by selecting C:\AUTOFLUID.INFINITY\AUTOFLUID-Menu.lsp > "Charger" > "Appliquer" > "Fermer".
If the problem persists please fill in the hotline form to contact a technician.
* Make sure you are logged on as a user with administrator rights:
Right-Click on the file directory C:\AUTOFLUID10 > Properties > Security tab
Click on the corresponding user name > "Full Control" must be checked.
1. In the AUTOCAD command line type: cui (return)

- Select "All customisation Files"
- Right-click on "AUTOFLUID10" > "Unload MENU.CUIX"
- Right-click on "AF-DOUBLECLIC" > "Unload AF-DOUBLECLIC.CUIX".
2. In the same dialogue box: check your workspace (it must be set to "current" AND "default")
- Select your workspace
- Right-click on "Set Current
- Right-click on "Set Default" > "Ok"
3. In the directory C:\AUTOFLUID10\Menu\_FRA :
- Keep the .mns, .mnl, .sav files
- Delete all the other files.
4. In the AUTOCAD command line type: appload (return)
In Startup suite click on "Contents..." and delete everything that's related to AUTOFLUID > "Close"
5. Select the menu C:\AUTOFLUID10\AUTOFLUID10-Menu-EN.lsp > "Load" > "Close"
If the problem persists please fill in the hotline form to contact a technician.
Check up to perform :
1. In your CAD software command line type: appload (return)
2. If you use AutoCAD, in Startup Suite
Click on "Contents" and delete all AUTOFLUID related content.
2. If you use Bricscad : The AutoLoad box must be unchecked.
Other checks if necessary (AutoCAD & ZWCAD):
1. Type: CUI (enter) in the commande line of your CAD software.
2. In the top left frame of the personnalisation dialog box:
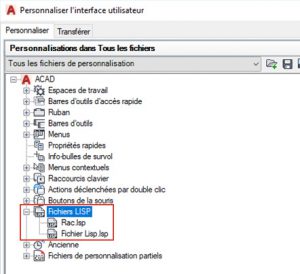
Click on "LISP files" and delete every file related to AUTOFLUID.
If the problem persists please fill in the hotline form to contact a technician.
1. In your CAD software command line type: appload (return)
2. Load the English menu:
For AUTOFLUID 10
C:\AUTOFLUID10\AUTOFLUID10-Menu-FR.lsp
For AUTOFLUID INFINITY
C:\AUTOFLUID.INFINITY\AUTOFLUID-Menu.lsp
And then choose your language.
If the problem persists please fill in the hotline form to contact a technician.
This happens when the AUTOFLUID menu loads up as main menu instead of partial menu.
1. In your CAD software command line type : menu (return)
Then select acad.cuix

2. In your CAD software command line type: appload (enter)
Then load the AUTOFLUID menu
If the problem persists please fill in the hotline form to contact a technician.
* Make sure you are logged in as a user with administrator rights :
Right-Click on the file directory C:\AUTOFLUID > Properties > Security tab
Click on the corresponding user name > "Full Control" must be checked.
* Check the paragraph: "Re-installing the menu"
If the problem persists please fill in the hotline form to contact a technician.
If the icons are not displayed normally in the ribbons, if they're blurred or unreadable, reload AUTOFLUID INFINITY:
1. In your CAD software command line type: appload (return)
2. Select C:\AUTOFLUID.INFINITY\AUTOFLUID-Menu.lsp > Load
If you've just switched between light and dark theme, follow the steps above to reload AUTOLFUID.
If the problem persists please fill in the hotline form to contact a technician.
Slow downs/crashes and/or file weight issues
There are too many applications running on the same .DWG at once. You must purge some of them.
Start with purging the "Applications data". Watch out for XREF, they must also be purged. The deepest must be purged first. If your XREF contain other XREF, start with the latest as they're the furthest away from the main drawing.
For example:

1. Open XREF.dwg: insert (purge-applic) in the command line, save and quit.
2. Open [your design file].dwg: insert (purge-applic) in the command line, save and quit.
Make sure to follow this order: from the furthest XREF to your DWG file.
If this doesn't solve your problem, then follow the steps below:
1. Open your CAD software and start a new drawing
2. In the command line type: _ RECOVER and select your .DWG file
3. Save the .DWG and then PURGE it using the CAD basic command
4. Save the .DWG and close it
5. Repeat the PURGE operation once
6. Reopen your .DWG file ans launch the AUTOFLUID File Treatment:
- Uncheck the options boxes
- Click on "Start treatment"
Dans AUTOFLUID INFINITY:

Dans AUTOFLUID 10:
7. Save the .DWG
If the treatment crashes (too many entities to be treated)
1. Reopen your .DWG file and launch AUTOFLUID
2. In your CAD software command line type: (Purge-dico) and validate
3. Save the .DWG and close it
4. Repeat the operation once
5. Restart the AUTOFLUID Files Treatment (see image above):
- Uncheck the options boxes
- Click on "Start treatment"
6. Save the .DWG
If the problem continues please fill in the hotline form to contact a technician.
Others
Please follow the same routine as described below for each type of equipment. This example shows the case of dampers:
1. In your CAD software command line type: 392 (return)

2. Check that the .DWG file related to the property tag indicated is located in the directory: C:\AUTOFLUID\Plus\2-reperes_attribues
(in the example below the file is called: AF-REG)
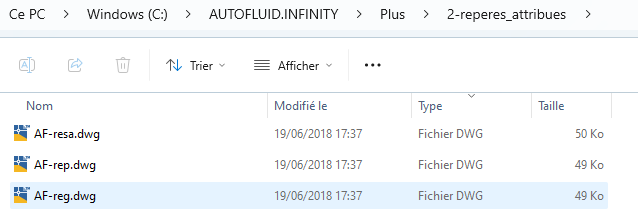
If the file AF-REG.DWG does not exist three solutions are available.
1. You can create a new one:
Open an existing file >File > Save as > AF-REG.DWG
Modify it if needed, then save and quit
2. Choose another from the list
3. Uncheck the box in the "dampers" frame.
(You won't be able to count the dampers anymore).
If the problem persists please fill in the hotline form to contact a technician.
To prevent AUTOFLUID from modifying your ECHLTP you have to make a change to your preference settings:
1. Load AUTOFLUID > click on the cogs icon (AUTOFLUID INFINITY) or on the spanner icon (AUTOFLUID 10) and then change your preferences > 'Modify' > 'Scale of the line types'
2. Check the box 'Do not manage the system and the Linetype scale factor'

If the problem persists please fill in the hotline form to contact a technician.
For example:

In your CAD software command line type
> fillmode (return)
> 1 (return)
> _UCS (return) (return)
> repere (return) (return)
> _VSCURRENT (return)
> 2 (return)
If the problem continues please fill in the hotline form to contact a technician.
How to
![]() YouTube video : 'Add a new line type with AUTOFLUID'
YouTube video : 'Add a new line type with AUTOFLUID'
--
For example: adding a new linetype that contains three letters:
------ AAA ------ AAA ------
1. Quit your CAD software
2. Open the file: C:\AUTOFLUID\Plus\5-Type_de_ligne\User.lin
3. Copy and paste the two lines of an existing type of line into the section "TYPE DE LIGNE à 3 Lettres"
4. Modify the letters in your copy of the definition
Make sure not to modify any of the numbers.
See below in red the text you should modify (ALWAYS IN CAPITAL LETTERS):
A_FLUID_AAA, --- AAA --- AAA --- AAA --- AAA --- AAA --- AAA ---
A,1.25,-0.079,["AAA",ARIAL,S=0.25,X=0,Y=-0.107],-0.829
5. Save the file
Warning: you MUST repeat the same operation in the file Useriso.lin".
6. Restart your CAD software
Each material part can be marked with an assigned block, which is called 'property tag' or 'assigned tag'.
You can create your own assigned tag - it can contain up to 20 attributes.
There are no particular constraint on the tag's attributes, on the descritpion prompts, or on the attribute's default value.
How to add a new assigned block:
1. Open an existing assigned block (ex : C:\AUTOFLUID\Plus\Reperes_attribues\AF-CCF.dwg).
2. Save as C:\AUTOFLUID\Plus\Reperes_attribues\MY-BLOCK.dwg.
3. Modify, add or delete attributes, and save the file.
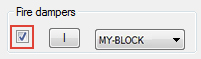
4. Start the 'Property tag' command and choose your new block in the list.


Check the corresponding box to have the assigned tag automatically inserted when drawing material parts:
Helpful tips:
>An attribute's tag must be precisely defined: it will be the column title of your bill of materials' table
> If an attribute's tag is "LM-NUMERO": when you will be inserting a material part, the assigned tag will insert as well - it will automatically be filled with a number corresponding to the number of blocks of the same name found in the file
> If an attribute's tag is "LM-SECTION" or "LM-NOM": when you will be inserting a material part, the assigned tag will insert as well and the size or the layer's name will automatically be filled
Reminder!
Two tags of the same block cannot have the same name.
An attribute can be visible or hidden.
1. Find the name of the tag you would like to modify in the assigned tags settings box.


2. Open the corresponding .DWG file in "C:\AUTOFLUID\Plus\2-reperes_attribues"
3. Modify, save and close the DWG .file.Find
How to change the look of assigned tags that you already inserted into your drawing
1. Insert "_INSERT" (enter) in the command box of your CAD software.
2. In the AUTOCAD library, double-click on the bloc of the assigned tag you wish to change.
3. Select "Redefine block" > your assigned tags change in your drawing.

Helpful tips:
>An attribute's tag must be precisely defined: it will be the column title of your bill of materials' table
> If an attribute's tag is "LM-NUMERO": when you will be inserting a material part, the assigned tag will insert as well - it will automatically be filled with a number corresponding to the number of blocks of the same name found in the file
> If an attribute's tag is "LM-SECTION" or "LM-NOM": when you will be inserting a material part, the assigned tag will insert as well and the size or the layer's name will automatically be filled
Reminder!
Two tags of the same block cannot have the same name.
An attribute can be visible or hidden.
![]() YouTube video on AUTOFLUID 10: 'How to modify a specification in AUTOFLUID"'
YouTube video on AUTOFLUID 10: 'How to modify a specification in AUTOFLUID"'
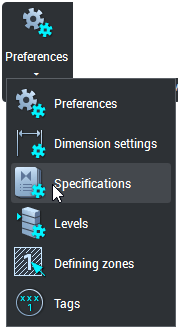
1. In the Preferences menu, select "Specifications".
In AUTOFLUID 10 : ribbon "AT>Metal pipe", "AS>Supply" or "AS>Drain pipes".
![]()
![]()
![]()
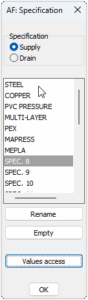
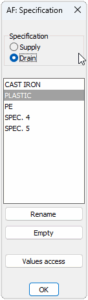
2. Select a Hydraulic/Sanitary routing specification or a Gravity specification > Values access
4. The values of the specification are given for each Nominal Diameter (DN). Enter the size of the DN for which you want to give size values and then select the equipment to specify. You may disregard the DNs that you will not be drawing.
The values that have not been entered will be requested during routing if they are required.
5. Enter the values and then save.
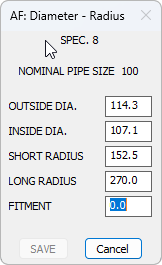
Please note:
- "Nominal pipe sizes" allows you to enter the dimensions of the pipes and fittings of the network.
- For reducers and reduced tees, both diameters must be specified.
It is possible to create a new specification from a blank specification or to duplicate an existing specification and then modify it.
STARTING FROM A BLANK SPECIFICATION
1. In the settings menu, select "Specifications".
In AUTOFLUID 10 : ribbon "AT>Metal pipe", "AS>Supply" or "AS>Drain pipes".
![]()
![]()
![]()
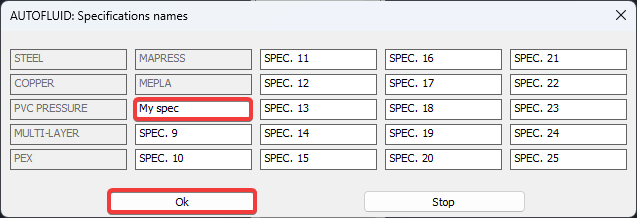
2. Select the type of specification, then select a free specification. (Specification names such as SPEC.8 or SPEC.4 are free by default) > "Rename"
3. Rename it > Ok.
Hydraulic/Sanitary Specifications
Gravity Specifications
4. Enter the Nominal Diameter (DN) size to be filled in, then access the material values to enter the dimensions for this DN size. Then save.
Please refer to the article "Modify or complete a specification" for more information on how to enter the values for your new specification.
BY DUPLICATING AND MODIFYING AN EXISTING SPECIFICATION
After loading AUTOFLUID, in the command line of your CAD software:
1/ Type "copispec" + enter
2/ Type "G" + enter for drain pipe specifications or "T" + enter for water and sanitary supply sepcifications .
3/ Type the number of the specification to duplicate (go back to the top of the list in the command window to see the specification numbers.).
4/ Type the number of the specification to overwrite + enter. Choose a blank specification such as SPEC.3 or SPEC.8 that will receive the copied data. You can also choose to overwrite a specification that has already been entered by selecting it.
5/ Confirm the command by typing "Yes" to replace.
6/ To edit the data that was duplicated: menu Paramétrage>"Spécifications" (In AUTOFLUID 10 : ribbon "AT>Metal pipe", "AS>Supply" or "AS>Drain pipes") and select the specification that has just been replaced.
Please refer to the article "Modify or complete a specification" for more information on how to enter the values for your new specification.
If you no longer wish to see a DN size for a specification, you can delete it by removing it from two specification files.
1. Find the specification's number in the list below.
Number match for water and sanitary supply specifications:
1 -> "STEEL"
2 -> "COPPER"
3 -> "PVC PRESSURE"
4 -> "MULTI-LAYER"
5 -> "PEX"
6 -> "MAPRESS"
7 -> "MEPLA"
8 -> "SPEC. 8 -> "SPEC. 25"
(If specs 8 to 25 are renamed, they still retain their original file number.)
Number match for drain networks specifications :
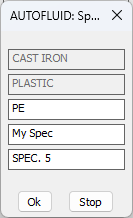
1 -> "CAST IRON"
2 -> "PLASTIC"
3 -> "PE"
4 -> "SPEC. 4"
5 -> "SPEC. 5"
(If specs 4 to 5 are renamed, they still retain their original file number.)
2. Open the directory containing the files for the relevant specification.
The water/sanitary specifications are in: C:\AUTOFLUIDXX\Plus\1-specifications\Tube
Drain networks specifications are in: C:\AUTOFLUIDXX\Plus\1-specifications\Gravitaire
3. Identify the two specification files to be modified.
- They start with "lm-a-01" and "lm-a-02".
- They end with the number of the relevant specification.
For example, "lm-a-01.s01" and "lm-a-01.s02" are the two files that need to be modified to remove an NPS in the STEEL supply specification.
4. Open both files with Notepad and identify the lines matching the DN size to be deleted.
Each of the two files contains a list where each line corresponds to a DN size.
For example:
In one of the files beginning with "lm-0-01", the line "(10 27.5 52.5 17.2 12.5 )" corresponds to DN size 10.
In one of the files beginning with "lm-0-02", the line "(0.01720 10 0.01250 )" corresponds to DN size 10.
5. In each of the two files in the relevant specification, delete the line containing the DN size to be removed and select File>Save.
Note: You can reset the specification files by running the file "C:\AUTOFLUIDXX\Plus\1-specifications\1-specifications.exe"
This will overwrite all files in the directory "C:\AUTOFLUIDXX\Plus\1-specifications". Remember to save a copy of any specification files you wish to keep before performing this operation.
1. Copy the folder C:\AUTOFLUID10\Plus\5-Type_de_ligne
2. Paste it in C:\AUTOFLUID.INFINITY\Plus (this will overwrite the existing one).
1. Copy the files contained in the folder C:\AUTOFLUID10\Plus\2-repères_attribués
2. Paste them in C:\AUTOFLUID.INFINITY\Plus\2-reperes_attribues (this will overwrite the existing files)
Compress the folder C:\AUTOFLUID10\Plus\1-spécifications and send it to hotline@traceocad.fr so that we can help you retrieve the AUTOFLUID 10 data for use in AUTOFLUID INFINITY.